第1章 初识爬虫
1.1 第一个爬虫程序
1 2 3 4 5 6 7 8 9 10 11 12 13 from urllib.request import urlopenurl = "http://www.baidu.com" resp = urlopen(url) with open ("mybaidu.html" , mode="w" ) as f: f.write(resp.read().decode("utf-8" )) print ("over" )
1.2 web请求过程剖析
服务器渲染:在服务器端直接把数据和html整合在一起,统一返回给浏览器——在源代码中有数据
客户端渲染:第一次请求只拿到html骨架。第二次请求拿到数据,进行数据展示——源代码中没数据
熟练使用浏览器抓包工具
1.3 HTTP协议
协议 :
就是两个计算机之间为了能够流畅的进行沟通而设置的一个君子协定。常见的有TCP/IP.SOAP协议,HTTP协议、SMTP协议等
HTTP 协议:
(Hyper Text Transfer Protocol)指超文本传输协议,是用于从万维网(www:,world wide web)服务器传输超文本到本地浏览器的传送协议,直白点,是浏览器和服务器之间的数据交互遵守的协议
HTTP协议把一条消息分为三大块消息(无论是请求还是响应)
请求 :
1
2
3
4
5
6
请求行 -> 请求方式(Request Method)(get/post) 请求URL地址 协议 请求头(Request Headers) -> 放一些服务器使用的附加信息 User-Agent:请求载体的身份标识(用啥发送的请求) Referer:防盗链(这次请求是从哪个页面来的)(反爬会用) Cookie:本地字符串数据信息(用户登录信息、反爬的token) 请求体 -> 一般放一些请求参数
响应 :
1
2
3
4
5
状态行 -> 协议 状态码(Status Code)(404等) 响应头(Response Headers) -> 放一些客户端要使用的一些附加信息 cookie:本地字符串数据信息(用户登录信息、反爬的token) 各种神奇的莫名其妙的字符串(依赖经验,一般都是token字样,防止各种攻击和反爬) 响应体 -> 服务器返回的真正客户端要用的内容(HTML、json)等
请求方式 :
GET:显示提交
POST:隐式提交
1.4 requests入门01
1 2 3 4 5 6 7 8 9 10 11 12 13 14 15 16 import requestsquery = input ("请输入你要搜索的一个关键词:" ) url = f'http://www.sogou.com/web?query={query} ' header = { "User-Agent" : "Mozilla/5.0 (Macintosh; Intel Mac OS X 10_15_7) AppleWebKit/537.36 (KHTML, like Gecko) Chrome/104.0.0.0 Safari/537.36" } resp = requests.get(url, headers=header) print (resp) print (resp.text)
1.5 requests入门02
1
2
3
4
5
6
7
8
9
10
11
12
import requestsurl = "https://fanyi.baidu.com/sug" s = input ("请输入你要翻译的英文单词:" ) dat = { "kw" : s } resp = requests.post(url, data=dat) print (resp.json())
1.6 requests入门03
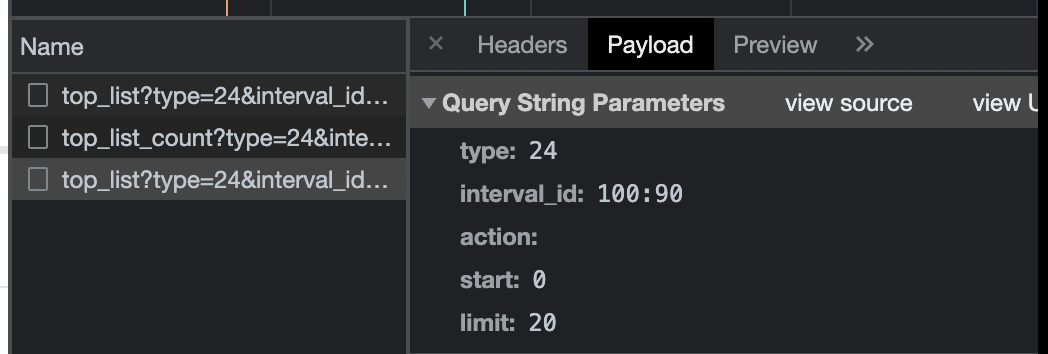
XHR :(XMLHttpRqquest)
URL :'?'前面为网址,后面为参数(可以在Query String Parameters中看到)
1
2
3
4
5
6
7
8
9
10
11
12
13
14
15
16
17
18
19
20
21
22
23
24
25
26
27
28
29
30
31
import requestsurl = "https://movie.douban.com/j/chart/top_list" param = { "type" : "24" , "interval_id" : "100:90" , "action" : "" , "start" : 0 , "limit" : 20 } header = { "User-Agent" : "Mozilla/5.0 (Macintosh; Intel Mac OS X 10_15_7) AppleWebKit/537.36 (KHTML, like Gecko) Chrome/104.0.0.0 Safari/537.36" } resp = requests.get(url=url, params=param,headers=header) print (resp.request.url)print (resp.text)print (resp.request.headers)print (resp.json())
1.7 补充
关掉resp, 避免请求次数过多,使用close方法关闭
1
2
3
4
import requestsurl = "https://movie.douban.com" resp = requests.get(url=url) resp.close()
open的编码问题: mac默认utf-8, win为gbk
1 open ("xxx.txt" , mode="w" , encoding = "gbk/utf-8" )
第2章 数据解析与提取
2.1 数据解析概述
三种解析方式:
re解析
bs4解析(性能慢)
xpath解析
三种方式可以混合使用,完全以结果做导向,只要能拿到想要的数据,用什么方案不重要,当掌握了这些之后再考虑性能问题
2.2 正则表达式
Regular Expression:
正则表达式,一种使用表达式方式对字符串进行匹配的语法规则
我们抓取到的网页源代码本质上是一个超长的字符串,想从里面提取内容,用正则再合适不过了
正则优点 :速度快、效率高、准确性高
正则缺点 :新手难度高
正则语法:使用元字符进行排列组合用来匹配字符串在线正则表达式测试
元字符 :
1
2
3
4
5
6
7
8
9
10
11
12
13
14
15
16
. 匹配除换行符以外的任意字符 \w 匹配字母数字下划线 \d 匹配数字 \n 匹配换行符 \t 匹配制表符 ^ 匹配字符串的开始 $ 匹配字符串的结尾 \W 匹配非字母数字下划线 \D 匹配非数字 \S 匹配非空白符号 a|b 匹配字符a或字符b () 匹配括号内的表达式,也表示一个组 [...] 匹配字符组中字符 [^...] 匹配除了字符组中的字符
量词 :控制前面的元字符出现的次数
1
2
3
4
5
6
* 重复零次或更多次 + 重复一次或更多次 ? 重复一次或多次(出现或不出现) {n} 至少匹配n次,n为非负整数 {n,m} 最少匹配n次且最多匹配m次 {n,} 重复n次或更多次
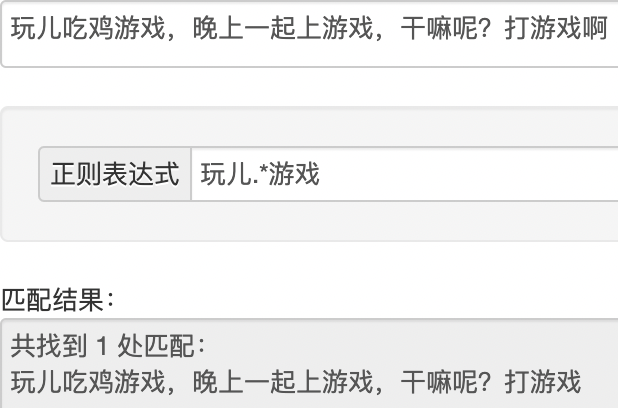
贪婪匹配和惰性匹配
1
2
.* 贪婪匹配(多个匹配选最长) .*? 惰性匹配(多个匹配选最短)
2.3 re模块
python中使用正则 -> re模块
re模块常见功能
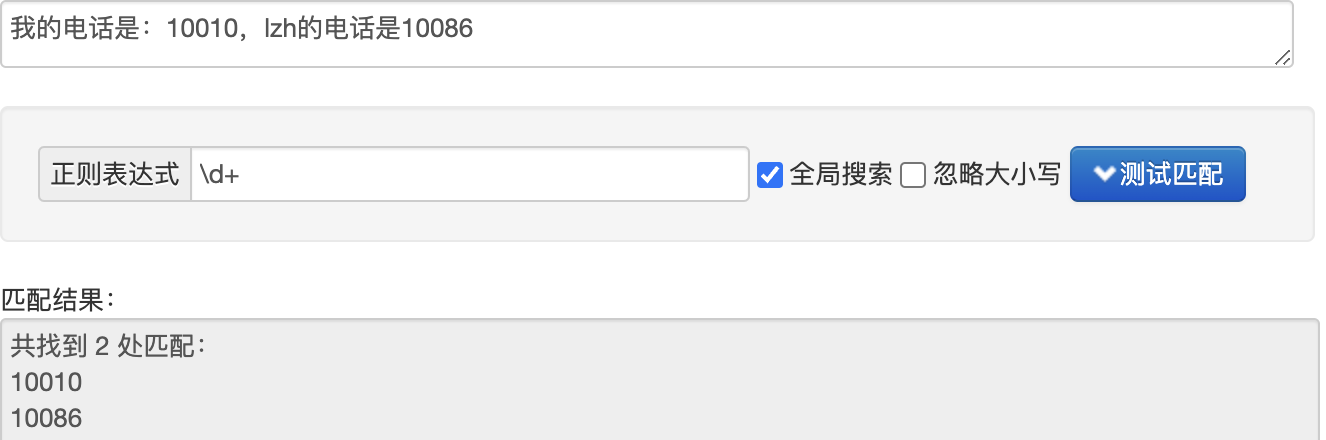
1
2
3
4
5
6
7
8
9
10
11
12
13
14
15
16
17
18
19
20
21
22
23
24
25
26
27
28
29
30
31
32
33
34
35
36
37
38
39
40
41
42
43
44
import relst = re.findall(r"\d+" , "我的电话是:10086" ) print ("findall:" , lst)it = re.finditer(r"\d+" , "我的电话是:10086,我女朋友的电话是10010" ) print ("finditer:" )for each in it: print (each.group()) s = re.search(r"\d+" , "我的电话是:10086,我女朋友的电话是10010" ) print ("search:" , s.group())s = re.match (r"\d+" , "10086,我女朋友的电话是10010" ) print ("match:" , s.group())obj = re.compile (r"\d+" ) ret = obj.finditer("我的电话号码是:10086,我女朋友的电话是:10010" ) print ("预加载:" )for it in ret: print (it.group()) ret = obj.findall("我的电话号码是:10086,我女朋友的电话是:10010" ) print (ret)s = """ <div class='lzh'><span id='1'>刘征昊</span></div> <div class='czy'><span id='2'>陈石榴</span></div> <div class='wyz'><span id='3'>王尖尖</span></div> <div class='xxq'><span id='4'>kesiu</span></div> <div class='wyx'><span id='5'>王冲冲</span></div> """ obj = re.compile (r"<div class='.*?'><span id='\d+'>.*?</span></div>" , re.S) result = obj.finditer(s) for it in result: print (it.group()) obj = re.compile (r"<div class='.*?'><span id='\d+'>(?P<name>.*?)</span></div>" , re.S) result = obj.finditer(s) for it in result: print (it.group("name" ))
2.4 re实例
2.4.1 手刃豆瓣TOP250
1 2 3 4 5 6 7 8 9 10 11 12 13 14 15 16 17 18 19 20 21 22 23 24 25 26 27 28 29 30 31 32 33 34 35 36 37 38 39 40 41 42 import requestsimport reimport csvimport osstart = 0 header = { "User-Agent" : "Mozilla/5.0 (Macintosh; Intel Mac OS X 10_15_7) AppleWebKit/537.36 (KHTML, like Gecko) Chrome/104.0.0.0 Safari/537.36" } os.remove("data.csv" ) f = open ("data.csv" , "a" ) while start <= 225 : url = f"https://movie.douban.com/top250?start={start} &filter=" start += 25 resp = requests.get(url, headers=header) page_content = resp.text obj = re.compile (r'<li>.*?<div class="item">.*?<span class="title">(?P<name>.*?)' r'</span>.*?<p class="">.*?<br>(?P<year>.*?) .*?' r'<span class="rating_num" property="v:average">(?P<score>.*?)</span>' r'.*?<span>(?P<num>.*?)人评价</span>' , re.S) result = obj.finditer(page_content) csvWriter = csv.writer(f) for it in result: dic = it.groupdict() dic["year" ] = dic["year" ].strip() csvWriter.writerow(dic.values()) f.close() print ("over!" )
2.4.2 屠戮电影天堂
html中a标签 表示超链接
1 <a href ='xxx' , title ='yyy' > zzz</a >
链接地址(href):xxx 链接预览(title):yyy 链接名称:zzz
1 2 3 4 5 6 7 8 9 10 11 12 13 14 15 16 17 18 19 20 21 22 23 24 25 26 27 28 29 30 31 32 33 34 35 36 37 38 39 40 import requestsimport redomain = "https://www.dytt89.com/" resp = requests.get(domain, verify=False ) resp.encoding = 'gb2312' obj1 = re.compile (r"2022必看热片.*?<ul>(?P<ul>.*?)</ul>" , re.S) obj2 = re.compile (r"<a href='(?P<href>.*?)'" , re.S) obj3 = re.compile (r'◎片 名(?P<movie>.*?)<br />.*?<td style="WORD-WRAP: ' r'break-word" bgcolor="#fdfddf"><a href="(?P<download>.*?)">' , re.S) result1 = obj1.finditer(resp.text) sub_href_lst = [] for it in result1: ul = it.group('ul' ) result2 = obj2.finditer(ul) for itt in result2: sub_href = domain + itt.group('href' ).strip("/" ) sub_href_lst.append(sub_href) for href in sub_href_lst: sub_resp = requests.get(href, verify=False ) sub_resp.encoding = 'gb2312' result3 = obj3.search(sub_resp.text) print (result3.group("movie" ).strip()) print (result3.group("download" ))
2.5 bs4解析_HTML语法
HTML是超文本标记语言,是我们编写网页的最基本也是最核心的一种语言,其语法规则就是用不同的标签对网页上的内容进行标记,从而使网页显示出不同的效果
1 2 3 4 5 6 <h1 > i love you </h1 > <h2 align ="center" > i don't love you </h2 >
h1:标签
1 2 3 <img src ="xxx.jpg" /> <br /> <a href ="http://www.baidu.com" > 周杰伦 </a >
自封闭标签⬆️
1 2 3 4 5 <div id ="1" class ="h1" > 周杰伦</div > <div id ="2" class ="h1" > 林俊杰</div > <div id ="3" class ="h1" > 马化腾</div > <div id ="4" class ="h4" > 唐老鸭</div > <div id ="5" class ="h5" > 刘征昊</div >
通过标签名称/特征来拿到数据
div -> id:3 =>马化腾
div -> class:h4 =>唐老鸭
2.6 bs4解析_新发地
安装:pip install bs4 -i
1.拿到页面源代码
2.使用bs4解析源代码
1
2
3
4
5
6
7
8
9
10
11
12
13
14
15
16
17
18
19
20
21
22
23
24
25
import requestsimport csvfrom bs4 import BeautifulSoupurl = "http://www.xinfadi.com.cn/index.html" resp = requests.get(url) f = open ("新发地.csv" , "w" ) csv_writer = csv.writer(f) page = BeautifulSoup(resp.text, "html.parser" ) table = page.find("table" , attrs={"border" : "0" , "cellspacing" : "0" , "cellpadding" : "0" }) print (table)trs = table.find_all("tr" ) for tr in trs: ths = tr.find_all("th" ) for i in range (len (ths)): ths[i] = ths[i].text csv_writer.writerow(ths)
2.7 bs4解析_抓取优美图库
1.拿到主页面的源代码,然后提取子页面的链接地址,href
2.通过href拿到子页面的内容,从子页面中找到图片的下载地址 img->src
3.下载图片(二进制文件直接写入)
1
2
3
4
5
6
7
8
9
10
11
12
13
14
15
16
17
18
19
20
21
22
23
24
25
26
27
28
29
30
31
32
33
34
35
36
import requestsfrom bs4 import BeautifulSoupimport timeurl = "https://www.umei.cc/bizhitupian/weimeibizhi/" resp = requests.get(url) resp.encoding = "utf-8" main_page = BeautifulSoup(resp.text, "html.parser" ) a_lst = main_page.find("div" , attrs={"class" : "swiper-box" }).find_all("a" ) for a in a_lst: href = "https://www.umei.cc" +a.get('href' ) sub_page_resp = requests.get(href) sub_page_resp.encoding = "utf-8" sub_page_text = sub_page_resp.text sub_page = BeautifulSoup(sub_page_text, "html.parser" ) section = sub_page.find("section" , attrs={"class" : "img-content" }) img = section.find("img" ) src = img.get("src" ) img_resp = requests.get(src) img_name = src.split('/' )[-1 ] with open ("2.7img/" +img_name, mode="wb" ) as f: f.write(img_resp.content) print ("over!" , img_name) time.sleep(1 ) print ("all over!" )
2.8 xpath解析
2.8.1 xpath解析入门1
xpath 是XML 文档中搜索内容的一种语言
html是xml的一个子集
1 2 3 4 5 6 7 8 9 <book > <id > 1</id > <name > 野花遍地香</name > <price > 1.23</price > <author > <nick > 周大强</nick > <nick > 周芷若</nick > </author > </book >
称作节点
book与id、name等互为父子节点;id name为兄弟节点
访问规则:/book/price(类似文件路径) 也可通过属性
安装lxml模块链接
1 2 3 4 5 6 7 8 9 10 11 12 13 14 15 16 17 18 19 20 21 22 23 24 25 26 27 28 29 30 31 32 33 34 35 36 37 from lxml import etreexml = """ <book> <id>1</id> <name>野花遍地香</name> <price>1.23</price> <nick>臭豆腐</nick> <author> <nick id="10086">周大强</nick> <nick id="10010">周芷若</nick> <nick class="jay">周杰伦</nick> <nick class="jolin">蔡依林</nick> <div> <nick>热热热热1</nick> </div> <span> <nick>热热热热2</nick> </span> </author> <partner> <nick id="ppc">胖胖沉</nick> <nick id="ppbc">胖胖不沉</nick> </partner> </book> """ tree = etree.XML(xml) result = tree.xpath("/book//nick/text()" ) print (result)
2.8.1 xpath解析入门2
1
2
3
4
5
6
7
8
9
10
11
12
13
14
15
16
17
18
from lxml import etreetree = etree.parse("2.8.2xpath.html" ) ol_li_lst = tree.xpath("/html/body/ol/li" ) for li in ol_li_lst: result = li.xpath("./a/text()" ) print (result) result2 = li.xpath("./a/@href" ) print (result2) print (tree.xpath("/html/body/ul/li/a/@href" ))print (tree.xpath("/html/body/div[1]/text()" ))
2.9 xpath解析实例_干猪八戒
步骤 :
拿到页面源代码
提取和解析
1
2
3
4
5
6
7
8
9
10
11
12
13
14
15
16
17
18
19
import requestsfrom lxml import etreeurl = "https://huhehaote.zbj.com/search/service/?kw=saas&r=1" resp = requests.get(url) html = etree.HTML(resp.text) divs = html.xpath('/html/body/div[@id="__nuxt"]/div/div/div[3]/div/div[3]/div[4]/div[1]/div' ) for div in divs: price = div.xpath("./div[3]/div[1]/span/text()" )[-1 ].strip("¥" ) title = div.xpath("./div[3]/a/text()" )[0 ] company_name = div.xpath("./a/div[2]/div[1]/div/text()" )[0 ] print (price) print (title) print (company_name)
第3章 requests模块进阶
3.1 requests进阶概述
headers是HTTP协议中的请求头,一般存放一些和请求内容无关的数据,有时也会存放一些安全验证信息,比如常见的:User-Agent,token,cookie等
通过 requests发送的请求,我们可以把请求头信息放在headers中,也可以单独进行存放,最终由requests自动帮我们拼接完成完整的http请求头。
本章内容 :
模拟浏览器登录->处理cookie
防盗链处理->抓取梨视频数据
代理->防止被封ip
综合训练:抓取网易云评论信息
3.2 模拟用户登录_处理cookie
登陆 -> 得到cookie,必须带着cookie去请求书架url -> 书架上得内容
**解决方案:**可以使用session(会话)进行请求 -> session可以认为是一连串的请求,在这个过程中cookie不会丢失
1
2
3
4
5
6
7
8
9
10
11
12
13
14
15
16
17
import requestssession = requests.session() data = { "loginName" : "19997617865" , "password" : "thebest1" } url = "https://passport.17k.com/ck/user/login" resp1 = session.post(url, data=data) resp2 = session.get("https://user.17k.com/ck/author/shelf?page=1&appKey=2406394919" ) print (resp2.json())
3.3 防盗链处理_抓取梨视频
无法打开的:https://video.pearvideo.com/mp4/adshort/20210122/ ==1660915088310==-15583450_adpkg-ad_hd.mp4
可以打开的:https://video.pearvideo.com/mp4/adshort/20210122/ ==cont-1717518==-15583450_adpkg-ad_hd.mp4
1660915088310 -> cont-1717518进行了替换
1.拿到cont ID
2.拿到videostatus返回的json -> srcURL
3.srcURL内容进行修改
4.下载视频
1
2
3
4
5
6
7
8
9
10
11
12
13
14
15
16
17
18
19
20
21
22
import requestsurl = "https://www.pearvideo.com/video_1717518" headers = { "User-Agent" : "Mozilla/5.0 (Macintosh; Intel Mac OS X 10_15_7) AppleWebKit/537.36 (KHTML, like Gecko) Chrome/104.0.0.0 Safari/537.36" , "Referer" : url } cont_id = url.split("_" )[-1 ] video_status = f"https://www.pearvideo.com/videoStatus.jsp?contId={cont_id} &mrd=0.24171138432822437" resp = requests.get(video_status, headers=headers) src_url = resp.json()['videoInfo' ]['videos' ]['srcUrl' ] system_time = resp.json()['systemTime' ] src_url = src_url.replace(system_time, f"cont-{cont_id} " ) print (src_url) with open ("vedio.mp4" , mode="wb" ) as f: f.write(requests.get(src_url).content) f.close()
3.4 代理
原理 :通过第三方的一个机器去发送请求
1
2
3
4
5
6
7
8
import requestsproxies = { "https" : "https://218.60.8.83:3129" } resp = requests.get("https://www.baidu.com" , proxies=proxies) resp.encoding = "utf-8" print (resp.text)
3.5 综合训练_抓取网易云音乐热评
1.找到未加密的参数
2.想办法把参数进行加密(参考网易逻辑), params -> encText / encSecKey(加密函数:window.arsea(参数, xxx…))
3.请求到网易,拿到评论信息
AES加密 :需要安装pycrypto -> pip install pycryptodome
1
2
3
4
5
6
7
8
9
10
11
12
13
14
15
16
17
18
19
20
21
22
23
24
25
26
27
28
29
30
31
32
33
34
35
36
37
38
39
40
41
42
43
44
45
46
47
from Crypto.Cipher import AESfrom base64 import b64encodeimport requestsimport jsonimport csvurl = "https://music.163.com/weapi/comment/resource/comments/get?csrf_token=" data = { "csrf_token" : "" , "cursor" : "-1" , "offset" : "0" , "orderType" : "1" , "pageNo" : "1" , "pageSize" : "20" , "rid" : "R_SO_4_1327162577" , "threadId" : "R_SO_4_1327162577" } e = "010001" f = "00e0b509f6259df8642dbc35662901477df22677ec152b5ff68ace615bb7b725152b3ab17a876aea8a5aa76d2e417629ec4ee341f56135fccf695280104e0312ecbda92557c93870114af6c9d05c4f7f0c3685b7a46bee255932575cce10b424d813cfe4875d3e82047b97ddef52741d546b8e289dc6935b3ece0462db0a22b8e7" g = "0CoJUm6Qyw8W8jud" i = "3CHtjTJeAW2lKHMy" def get_encSecKey (): return "de70557c99d4da3c4dba685119fcd3f6b5bf2f3561c659e53f94ab691d60408944d95d00d882b586429236fc882895060b4aba652eef62071323a4f1bee911d2be7146f21a741dc3b3335c0df1d0949c3c484a845f5b8c97a404c156647157116acd5301bbab9607a08d85d764dc3cb8bf519e97f87a81ee3d64ed3e0c9f0e83" def get_params (d ): first = enc_params(d, g) second = enc_params(first, i) return second def to_16 (d ): pad = 16 - len (d) % 16 d += chr (pad) * pad return d def enc_params (d, key ): iv = "0102030405060708" d = to_16(d) aes = AES.new(key=key.encode("utf-8" ), IV=iv.encode("utf-8" ), mode=AES.MODE_CBC) bs = aes.encrypt(d.encode("utf-8" )) return str (b64encode(bs), "utf-8" )
加密源代码:
1
2
3
4
5
6
7
8
9
10
11
12
13
14
15
16
17
18
19
20
21
22
23
24
25
26
27
28
29
30
31
32
function a (a ) { var d, e, b = "abcdefghijklmnopqrstuvwxyzABCDEFGHIJKLMNOPQRSTUVWXYZ0123456789" , c = "" ; for (d = 0 ; a > d; d += 1 ) e = Math .random () * b.length , e = Math .floor (e), c += b.charAt (e); return c } function b (a, b ) { var c = CryptoJS .enc .Utf8 .parse (b) , d = CryptoJS .enc .Utf8 .parse ("0102030405060708" ) , e = CryptoJS .enc .Utf8 .parse (a) , f = CryptoJS .AES .encrypt (e, c, { iv : d, mode : CryptoJS .mode .CBC }); return f.toString () } function c (a, b, c ) { var d, e; return setMaxDigits (131 ), d = new RSAKeyPair (b,"" ,c), e = encryptedString (d, a) } function d (d, e, f, g ) { var h = {} , i = a (16 ); return h.encText = b (d, g), h.encText = b (h.encText , i), h.encSecKey = c (i, e, f), h }
加密后请求:
1
2
3
4
resp = requests.post(url, data={ "params" : get_params(json.dumps(data)), "encSecKey" : get_encSecKey(), })
评论数据提取及输出:
1
2
3
4
5
6
7
8
9
10
11
12
13
14
15
16
17
18
19
20
f = open ("comment.csv" , mode="w" ) f_hot = open ("comment_hot.csv" , mode="w" ) csv_writer = csv.writer(f) csv_writer_hot = csv.writer(f_hot) users = resp.json()["data" ]["comments" ] for user in users: nickname = user["user" ]["nickname" ] content = user["content" ] timeStr = user["timeStr" ] comment = [nickname, content, timeStr] csv_writer.writerow(comment) users_hot = resp.json()["data" ]["hotComments" ] for user_hot in users_hot: nickname = user_hot["user" ]["nickname" ] content = user_hot["content" ] timeStr = user_hot["timeStr" ] comment_hot = [nickname, content, timeStr] csv_writer_hot.writerow(comment_hot)
第4章 多线程与多进程
4.1 线程与进程
进程:资源单位,每个进程至少含有一个线程
4.2 多线程
4.2.1 单线程
1
2
3
4
5
6
7
def func (): for i in range (1000 ): print ("func" , i) if __name__ == '__main__' : func() for i in range (1000 ): print ("main" , i)
4.2.2 多线程1
1
2
3
4
5
6
7
8
9
from threading import Threaddef func (): for i in range (1000 ): print ("func" , i) if __name__ == '__main__' : t = Thread(target=func, args=("一号" ,)) t.start() for i in range (1000 ): print ("main" , i)
4.2.3 多线程2
1
2
3
4
5
6
7
8
9
10
from threading import Threadclass myThread (Thread ): def run (self ): for i in range (1000 ): print ("子线程" , i) if __name__ == '__main__' : t = myThread() t.start() for i in range (1000 ): print ("主线程" , i)
4.4 线程池和进程池
线程池 :一次性开辟一些线程,用户直接给线程池提交任务,线程任务的调度交给线程池来完成
1
2
3
4
5
6
7
8
9
10
11
from concurrent.futures import ThreadPoolExecutor, ProcessPoolExecutordef fn (name ): for i in range (1000 ): print (name, i) if __name__ == "__main__" : with ThreadPoolExecutor(50 ) as t: for i in range (100 ): t.submit(fn, name=f"线程{i} " ) print ("over" )
4.5 线程池和进程池实例_新发地菜价
1.如何提取单个页面的数据
2.上线程池,多个页面同时抓取
1
2
3
4
5
6
7
8
9
10
11
12
13
14
15
16
17
18
19
20
21
22
23
24
25
26
27
28
29
import requestsimport csvfrom concurrent.futures import ThreadPoolExecutorurl = "http://www.xinfadi.com.cn/getPriceData.html" f = open ("菜价.csv" , "w" ) csvWriter = csv.writer(f) firstLine = ['prodName' , 'lowPrice' , 'highPrice' , 'avgPrice' , 'unitInfo' , 'place' , 'pubDate' ] csvWriter.writerow(firstLine) def download_one_page (current ): data = { "current" : str (current) } resp = requests.post(url, data=data) lsts = resp.json()['list' ] for dic in lsts: lst = [dic['prodName' ], dic['lowPrice' ], dic['highPrice' ], dic['avgPrice' ], dic['unitInfo' ], dic['place' ], dic['pubDate' ].split()[0 ]] csvWriter.writerow(lst) if __name__ == "__main__" : with ThreadPoolExecutor(50 ) as t: for i in range (1 , 201 ): t.submit(download_one_page, i) print ("over!" ) f.close()
4.6 协程
协程 :当程序遇到了IO操作,可以选择性的切换到其他任务上。
微观上一个任务一个任务的切换,切换条件为IO操作;宏观上,可以观察到多个任务同时进行。(==多任务异步操==作)
条件:单线程
1
2
3
4
5
6
7
8
9
10
import timedef func (): print ("我爱" ) time.sleep(3 ) print ("我真的爱" ) if __name__ == "__main__" : func()
py编写协程的程序
1
2
3
4
5
6
7
8
9
10
11
12
13
14
15
16
17
18
19
20
21
22
23
24
25
26
27
28
29
import asyncioimport timeasync def func1 (): print ("hello!" ) await asyncio.sleep(2 ) print ("byebye" ) async def func2 (): print ("我叫lzh" ) await asyncio.sleep(3 ) print ("你好啊" ) async def func3 (): print ("我叫lst" ) await asyncio.sleep(4 ) print ("你好美啊" ) if __name__ == "__main__" : f1 = func1() f2 = func2() f3 = func3() tasks = [f1, f2, f3] t1 = time.time() asyncio.run(asyncio.wait(tasks)) t2 = time.time() print (t2 - t1)
出现同步操作时的异步操作
1
2
3
4
5
6
7
8
9
10
11
12
13
14
15
16
17
18
19
20
21
22
23
24
25
26
27
28
29
30
31
32
33
async def func1 (): print ("hello!" ) await asyncio.sleep(2 ) print ("byebye" ) async def func2 (): print ("我叫lzh" ) await asyncio.sleep(3 ) print ("你好啊" ) async def func3 (): print ("我叫lst" ) await asyncio.sleep(4 ) print ("你好美啊" ) async def main (): tasks = [asyncio.create_task(func1()), asyncio.create_task(func2()), asyncio.create_task(func3())] await asyncio.wait(tasks) if __name__ == "__main__" : t1 = time.time() asyncio.run(main()) t2 = time.time() print (t2 - t1)
在爬虫领域的应用
1
2
3
4
5
6
7
8
9
10
11
12
13
14
15
16
17
18
19
20
21
22
23
async def download (url ): print ("准备开始下载" ) await asyncio.sleep(2 ) print ("下载完成" ) async def main (): urls = [ "http://www.baidu.com" , "http://www.google.com" , "http://www.163.com" ] tasks = [] for url in urls: tasks.append(asyncio.create_task(download(url))) await asyncio.wait(tasks) if __name__ == "__main__" : b_id = "4306063500" url = "www" asyncio.run(download, url)
4.7 异步http请求_aiohttp模块讲解
requests.get()同步的代码 -> 异步操作aiohttp
安装:pip install aiohttp
1
2
3
4
5
6
7
8
9
10
11
12
13
14
15
16
17
18
19
20
21
22
23
24
25
26
27
28
import asyncioimport aiohttpurls = [ "http://kr.shanghai-jiuxin.com/file/2022/0812/59a67a6e9e44225285d4a545cd2acb0e.jpg" , "http://kr.shanghai-jiuxin.com/file/2022/0811/94294a360b48155f87bf1e25fe6c247a.jpg" , "http://kr.shanghai-jiuxin.com/file/2022/0812/36bc4b3ea78ece2a9ec2d8bf826b36e5.jpg" ] async def aiodownload (url ): name = "4.7img/" +url.rsplit("/" )[-1 ] async with aiohttp.ClientSession() as session: async with session.get(url, verify_ssl=False ) as resp: with open (name, "wb" ) as f: f.write(await resp.content.read()) print (name, ":over" ) async def main (): tasks = [] for url in urls: tasks.append(asyncio.create_task(aiodownload(url))) await asyncio.wait(tasks) if __name__ == "__main__" : asyncio.run(main())
4.8异步爬虫实战_扒光一部小说
1.同步操作:访问getCatalog 拿到所有章节的cid和名称目录url: https://dushu.baidu.com/api/pc/getCatalog?data={“book_id”:“4355370985”} https://dushu.baidu.com/api/pc/getChapterContent?data={“book_id”:“4355370985”,“cid”:“4355370985|1566855961”,“need_bookinfo”:1}
1
2
3
4
5
6
7
8
9
10
11
12
13
14
15
16
17
18
19
20
21
22
23
24
25
26
27
28
29
30
31
32
33
34
35
36
37
38
import requestsimport asyncioimport aiohttpimport aiofilesimport jsonasync def aiodownload (cid, bid, title ): data = { "book_id" : f"{bid} " , "cid" : f"{bid} |{cid} " , "need_bookinfo" : 1 } data = json.dumps(data) url_content = f"https://dushu.baidu.com/api/pc/getChapterContent?data={data} " async with aiohttp.ClientSession() as session: async with session.get(url_content, verify_ssl=False ) as resp: dic = await resp.json() name = "4.8novel/" +title+".txt" async with aiofiles.open (name, "w" , encoding="utf-8" ) as f: await f.write(dic['data' ]['novel' ]['content' ]) async def getCatalog (u ): resp = requests.get(u) dic = resp.json() tasks = [] for item in dic['data' ]['novel' ]['items' ]: title = item['title' ] cid = item['cid' ] tasks.append(asyncio.create_task(aiodownload(cid, book_id, title))) await asyncio.wait(tasks) if __name__ == "__main__" : book_id = "4355370985" url = 'https://dushu.baidu.com/api/pc/getCatalog?data={"book_id":' + book_id + '}' asyncio.run(getCatalog(url))
4.9 综合训练_抓取91视频
4.9.1 综合训练_视频网站的工作原理
1 <video src ="/Users/lzh/Documents/workSpace/pycharm/crawl/第3章/video.mp4" > </video >
一般视频网站是怎么做的?
用户上传 -> 转码(把视频做处理,不同清晰度) -> 切片处理(把单个文件拆分)
用户在拉动进度条的时候,直接从某切片开始加载
需要一个文件记录: m 3 u + ′ u t f − 8 ′ = m 3 u 8 m3u + 'utf-8' = m3u8 m 3 u + ′ u t f − 8 ′ = m 3 u 8
视频播放顺序
视频存放路径
其他信息
想要抓取一个视频:
找到m3u8(各种手段)
通过m3u8下载ts文件
可以通过各种手段(包括但不限于编程),把ts文件合并为mp4
比较常用和关键的字段: (其他详见m3u8关键字段 )EXTM3U :这个是M3U8文件必须包含的标签,并且必须在文件的第一行,所有的M3U8文件中必须包含这个标签。EXT-X-VERSION :M3U8文件的版本,常见的是3(目前最高版本应该是7)。EXT-X-TARGETDURATION :该标签指定了*==单个媒体文件持续时间的最大值==*,播放文件列表中的媒体文件在EXTINF标签中定义的持续时间必须小于或者等于该标签指定的持续时间。该标签在播放列表文件中必须出现一次。EXT-X-MEDIA-SEQUENCE :M3U8直播是的直播切换序列,当播放打开M3U8时,以这个标签的值作为参考,播放对应的序列号的切片。EXTINF :为M3U8列表中每一个分片的duration,如上面例子输出信息中的第一片的duration为2.969秒。在EXTINF标签中,除了duration值,还可以包含可选的描述信息,主要为标注切片信息,使用逗号分隔开。EXT-X-KEY :表示怎么对media segments进行解码。其作用范围是下次该tag出现前的所有media URI,格式如下:
1 #EXT-X-KEY:<attribute-list>:
NONE 或者 AES-128。如果是NONE,则URI以及IV属性必须不存在,如果是AES-128(Advanced EncryptionStandard),则URI必须存在,IV可以不存在。
4.9.2 综合训练_抓取91看剧(简单)
流程:
拿到html页面源代码
从源码中提取m3u8的url
下载m3u8,下载视频
合并视频
下载m3u8
1
2
3
4
5
6
7
8
9
10
11
12
13
14
15
import requestsimport reobj = re.compile (r"url: '(?P<url_m3u8>.*?)'," , re.S) url = "http://91kanju2.com/vod-play/62916-3-1.html" resp = requests.get(url) url_m3u8 = obj.search(resp.text).group("url_m3u8" ) resp.close() resp_m3u8 = requests.get(url_m3u8) with open ("重生之门.m3u8" , "wb" ) as f: f.write(resp_m3u8.content) resp_m3u8.close() print ("over" )
解析m3u8
1
2
3
4
5
6
7
8
9
10
11
n = 1 with open ("重生之门.m3u8" , mode="r" , encoding="utf-8" ) as f: for line in f: line = line.strip() if line.startswith("#" ): continue resp_ts = requests.get(line) f = open (f"4.9video_91/{n} .ts" , mode="wb" ) f.write(resp_ts.content) n += 1 print ("完成了第n个ts下载" )
4.9.3 综合训练_抓取91看剧(复杂)
思路
拿到主页面的页面源代码,找到iframe
从iframe的源代码中拿到m3u8文件
下载第一层m3u8文件 -> 下载第二层m3u8文件(ts存放路径)
下载ts文件
下载密钥,进行解密
合并ts为一个mp4
1
2
3
4
5
6
7
8
9
10
11
12
13
14
15
16
17
18
19
20
21
22
23
24
25
26
27
28
29
30
31
32
33
34
35
36
37
38
39
40
41
42
43
44
45
46
47
48
49
50
51
52
53
54
55
56
57
58
59
60
61
62
63
64
65
66
67
68
69
70
71
72
73
74
75
76
77
78
79
80
81
82
83
84
85
86
87
88
89
90
91
92
93
94
95
96
97
98
99
100
101
102
103
104
105
106
107
108
109
110
111
112
113
114
115
116
117
import requestsimport asyncioimport aiohttpimport aiofilesfrom Crypto.Cipher import AESimport osdef get_iframe_src (ur ): return "https://kanju77.com/xgplayer.html?url=https://youku.sd-play.com/20220820/9jja4ALL/index.m3u8" def get_first_m3u8_url (ur ): m3u8_url = ur.split("=" )[-1 ] return m3u8_url def download_m3u8_file (ur, name ): resp = requests.get(ur) with open ("4.9.3video_91/" + name, mode="wb" ) as f: f.write(resp.content) async def download_ts (ur, fname, sess ): async with sess.get(ur, verify_ssl=False ) as resp: async with aiofiles.open (f"4.9.3video_91/{fname} " , mode="wb" ) as f: await f.write(await resp.content.read()) print (f"{fname} 下载完毕" ) async def aio_download (name ): tasks = [] async with aiohttp.ClientSession() as session: async with aiofiles.open (name, mode="r" , encoding="utf-8" ) as f: async for line in f: if line.startswith("#" ): continue ts_url = line.strip() task = asyncio.create_task(download_ts(ts_url, line.split("/" )[-1 ].strip(), session)) tasks.append(task) await asyncio.wait(tasks) def get_key (ur ): resp = requests.get(ur) return resp.text async def decode_ts (fn, k ): aes = AES.new(key=k.encode("utf-8" ), IV=b"0000000000000000" , mode=AES.MODE_CBC) async with aiofiles.open (f"4.9.3video_91/{fn} " , mode="rb" ) as f1, \ aiofiles.open (f"4.9.3video_91/temp_{fn} " , mode="wb" ) as f2: bs = await f1.read() await f2.write(aes.decrypt(bs)) print (f"{fn} over!" ) async def aio_decode (k ): tasks = [] async with aiofiles.open ("4.9.3video_91/second.m3u8" , mode="r" , encoding="utf-8" ) as f: async for line in f: if line.startswith("#" ): continue fname = line.split("/" )[-1 ].strip() task = asyncio.create_task(decode_ts(fname, k)) tasks.append(task) await asyncio.wait(tasks) def merge_ts (): lst = [] with open ("4.9.3video_91/second.m3u8" , mode="r" , encoding="utf-8" ) as f: for line in f: if line.startswith("#" ): continue fname = line.split("/" )[-1 ].strip() lst.append(f"4.9.3video_91/temp_{fname} " ) s = " " .join(lst) os.system(f"cat {s} > 4.9.3video_91/movie.mp4" ) print ("all over!" ) def main (ur ): iframe_src = get_iframe_src(ur) first_m3u8_url = get_first_m3u8_url(iframe_src) download_m3u8_file(first_m3u8_url, "first.m3u8" ) print ("m3u8_1 over" ) with open ("4.9.3video_91/first.m3u8" , mode="r" , encoding="utf-8" ) as f: for line in f: if line.startswith("#" ): continue else : line = line.strip() second_m3u8_url = first_m3u8_url.split("/20220820/" )[0 ] + line download_m3u8_file(second_m3u8_url, "second.m3u8" ) print ("m3u8_2 over" ) asyncio.run(aio_download("4.9.3video_91/second.m3u8" )) key_url = second_m3u8_url.replace("index.m3u8" , "key.key" ) key = get_key(key_url) asyncio.run(aio_decode(key)) merge_ts() if __name__ == "__main__" : url = "https://f.vhttps.com/vy/113082-2-1/" main(url)
第五章 selenium
5.1 selenium引入
能不能让我的程序连接到浏览器,让浏览器来完成各种复杂的操作,我们只接受最终的成果?
selenium :自动化测试工具 -> 打开浏览器,像人一样去操作浏览器。程序员可以从selenium中直接提取网页上的各种信息
环境搭建:
下载浏览器驱动 把解压缩的浏览器驱动 chromedriver 放在python解释器所在文件夹
让selenium启动谷歌浏览器:
1
2
3
4
5
6
7
8
from selenium.webdriver import Chromeweb = Chrome() web.get("http://www.baidu.com" ) print (web.title)
5.2 selenium各种操作_抓拉钩
1
2
3
4
5
6
7
8
9
10
11
12
13
14
15
16
17
18
19
20
21
22
23
24
25
26
from selenium.webdriver import Chromefrom selenium.webdriver.common.by import Byfrom selenium.webdriver.common.keys import Keysimport timeweb = Chrome() web.get("http://lagou.com" ) el = web.find_element(By.XPATH, '//*[@id="changeCityBox"]/p[1]/a' ) el.click() time.sleep(1 ) web.find_element(By.XPATH, '//*[@id="search_input"]' ).send_keys("python" , Keys.ENTER) div_lst = web.find_elements(By.XPATH, '//*[@id="jobList"]/div[1]/div' ) for div in div_lst: time.sleep(0.1 ) job_name = div.find_element(By.TAG_NAME, "a" ).text job_price = div.find_element(By.XPATH, './div[1]/div[1]/div[2]/span' ).text job_company = div.find_element(By.XPATH, './div[1]/div[2]/div[1]/a' ).text print (job_company, job_name, job_price)
5.3 selenium_窗口之间的切换
1
2
3
4
5
6
7
8
9
10
11
12
13
from selenium.webdriver import Chromefrom selenium.webdriver.common.by import Byimport timeweb = Chrome() web.get("http://lagou.com" ) web.find_element(By.XPATH, '//*[@id="cboxClose"]' ).click() time.sleep(1 ) web.find_element(By.XPATH, '//*[@id="search_input"]' ).send_keys('python\n' ) time.sleep(0.8 ) web.find_element(By.XPATH, '//*[@id="jobList"]/div[1]/div[1]/div[1]/div[1]/div[1]/a' ).click()
如何进入新窗口提取内容?
1 2 3 4 5 6 7 8 9 10 web.switch_to.window(web.window_handles[-1 ]) job_detail = web.find_element(By.XPATH, '//*[@id="job_detail"]/dd[2]/div' ) print (job_detail.text)web.close() web.switch_to.window(web.window_handles[0 ]) print (web.find_element(By.XPATH, '//*[@id="jobList"]/div[1]/div[1]/div[1]/div[1]/div[1]/a' ).text)
如果页面中遇到了iframe怎么处理?
1 2 3 4 5 6 web.get("https://f.vhttps.com/vy/113082-2-1/" ) iframe = web.find_element(By.XPATH, '//*[@id="playleft"]/iframe' ) web.switch_to.frame(iframe) print (web.find_element(By.XPATH, '/html/head/title' ).text)
5.4 无头浏览器
1
2
3
4
5
6
7
8
9
10
11
12
13
14
15
16
17
18
19
20
21
22
23
24
25
import timefrom selenium.webdriver.chrome.options import Optionsfrom selenium.webdriver import Chromefrom selenium.webdriver.support.select import Selectfrom selenium.webdriver.common.by import Byopt = Options() opt.add_argument("--headless" ) opt.add_argument("--disable-gpu" ) web = Chrome(options=opt) web.get("https://ys.endata.cn/BoxOffice/Ranking" ) sel_el = web.find_element(By.XPATH, "xxx" ) sel = Select(sel_el) for i in range (len (sel.options)): sel.select_by_index(i) time.sleep(1 ) table = web.find_element(By.XPATH, 'xxxx' ) print (table.text) web.close() print (web.page_source)
5.5 超级鹰处理验证码
1.图像识别
2.选择互联网上成熟的验证码破解工具——超级鹰.py
5.6 超级鹰处理超级鹰
1
2
3
4
5
6
7
8
9
10
11
12
13
14
15
16
17
18
19
20
21
22
23
import timefrom selenium.webdriver.chrome.options import Optionsfrom selenium.webdriver import Chromefrom selenium.webdriver.common.by import Byfrom chaojiying import Chaojiying_Clientopt = Options() opt.add_experimental_option("detach" , True ) web = Chrome(options=opt) web.get("http://www.chaojiying.com/user/login/" ) img = web.find_element(By.XPATH, '/html/body/div[3]/div/div[3]/div[1]/form/div/img' ).screenshot_as_png chaojiying = Chaojiying_Client('19997617865' , 'thebest1' , '938270' ) dic = chaojiying.PostPic(img, 1902 ) verify_code = dic['pic_str' ] web.find_element(By.XPATH, '/html/body/div[3]/div/div[3]/div[1]/form/p[1]/input' ).send_keys("19997617865" ) web.find_element(By.XPATH, '/html/body/div[3]/div/div[3]/div[1]/form/p[2]/input' ).send_keys("thebest1" ) web.find_element(By.XPATH, '/html/body/div[3]/div/div[3]/div[1]/form/p[3]/input' ).send_keys(verify_code) web.find_element(By.XPATH, '/html/body/div[3]/div/div[3]/div[1]/form/p[4]/input' ).click() time.sleep(3 )
5.7 搞定12306的登陆问题
1
2
3
4
5
6
7
8
9
10
11
12
13
14
15
16
17
18
19
20
21
22
23
24
25
26
27
28
29
30
31
32
33
34
35
36
37
38
39
40
41
42
43
44
import timefrom selenium.webdriver.chrome.options import Optionsfrom selenium.webdriver.common.by import Byfrom selenium.webdriver import Chromefrom selenium.webdriver.common.action_chains import ActionChainsfrom chaojiying import Chaojiying_Clientchaojiying = Chaojiying_Client("19997617865" , "thebest1" , "938270" ) opt = Options() opt.add_experimental_option("detach" , True ) web = Chrome(options=opt) web.get("https://kyfw.12306.cn/otn/resources/login.html" ) time.sleep(2 ) web.find_element(By.XPATH, '//*[@id="toolbar_Div"]/div[2]/div[2]/ul/li[1]/a' ).click() time.sleep(2 ) verify_img_content = web.find_element(By.XPATH, 'img_xpath' ) dic = chaojiying.PostPic(verify_img_content.screenshot_as_png, 9004 ) result = dic['pic_str' ] rs_lst = result.split("|" ) for rs in rs_lst: tmp = rs.split("," ) x = int (tmp[0 ]) y = int (tmp[1 ]) ActionChains(web).move_to_element_with_offset(verify_img_content, x, y).click().perform() time.sleep(1 ) web.find_element(By.XPATH, '//*[@id="J-userName"]' ).send_keys('19997617865' ) web.find_element(By.XPATH, '//*[@id="J-password"]' ).send_keys('thebest1' ) web.find_element(By.XPATH, '//*[@id="J-login"]' ).click() time.sleep(3 ) btn = web.find_element(By.XPATH, '//*[@id="nc_1_n1z"]' ) ActionChains(web).drag_and_drop_by_offset(btn, 300 , 0 ).perform()
专题:干b站视频
步骤:
弄明白b站如何加载视频:
抓包工具抓包/拿源代码
写正则
转化为字典,url
下载视频音频
合并起来